Choosing Hydronic Heat Transfer Plates is a practical engineering decision, not a simple product comparison. These aluminum components spread heat from embedded pipes across a floor or wall assembly. Their performance depends on conductivity, plate geometry, pipe contact, insulation, and the final surface covering. Small details matter.
The U.S. Department of Energy explains that radiant heating can provide efficient, even comfort when the system is correctly designed and installed. ASHRAE’s Handbook—HVAC Systems and Equipment also emphasizes the importance of heat output, surface temperatures, control strategy, and system balance. Meanwhile, the International Energy Agency’s The Future of Heat Pumps report identifies low-temperature heating as an important pathway for improving heat-pump performance. Hydronic plates support that pathway by improving heat distribution and potentially allowing lower water temperatures.
However, the highest conductivity rating does not automatically produce the best result. That assumption is risky. A thick aluminum plate may perform poorly if the pipe sits loosely in the channel or if insulation beneath the system is inadequate. Floor finish also changes the required design. Tile, engineered wood, and carpet do not transfer heat equally. Pipe spacing matters, too.
This guide examines the selection process through measurable criteria, installation realities, and manufacturer documentation. It considers plate thickness, alloy, channel shape, pipe diameter, corrosion resistance, and compatibility with different floor systems. Standards and reports provide a useful foundation, but actual site conditions still require judgment. Some recommendations remain imperfect because building heat loss, workmanship, and control settings can vary widely. The right choice is therefore the one that matches the entire assembly, not merely the cheapest plate or the most impressive specification.
Understanding Hydronic Heat Transfer Plates and Their Role
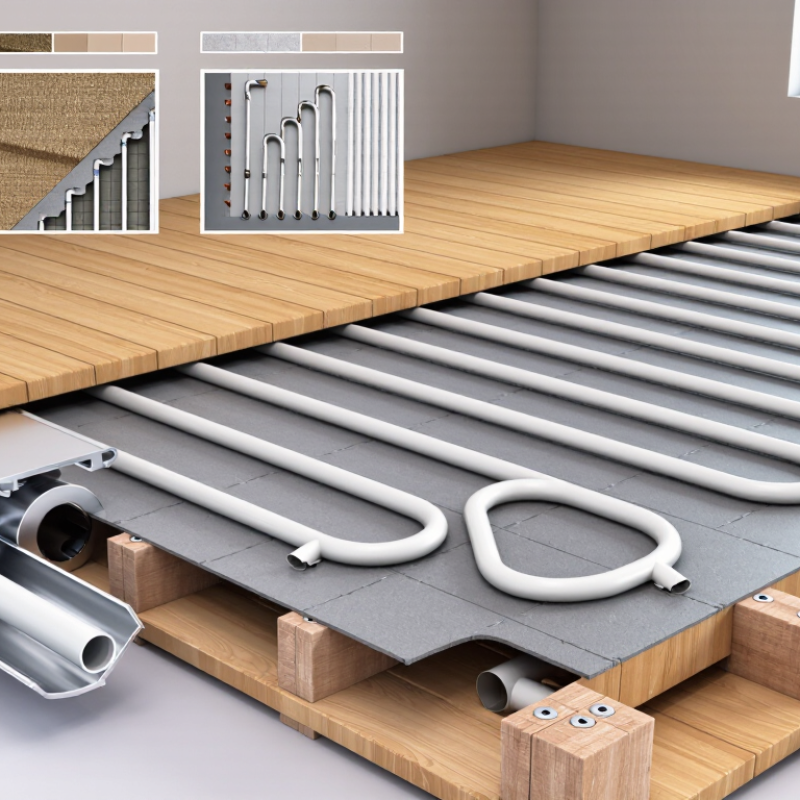
Hydronic heat transfer plates connect warm tubing with the floor above. They spread heat across a wider surface, reducing cold stripes between tubing runs. Most plates use aluminum because it transfers heat efficiently and adds little weight. The tubing sits inside a formed channel or against a flat contact surface. A close fit matters. Gaps can create uneven temperatures and slower floor response.
Choosing plates starts with the heating layout, not the plate alone. Confirm the tube diameter, joist spacing, floor construction, and required water temperature. Extruded plates usually provide firm tubing contact and consistent coverage. Stamped plates may cost less, but their fit and thickness need careful checking. Wider plates distribute heat more evenly across subfloor panels. Narrow plates can work, although they may produce visible warm and cool bands.
Installation details often decide performance. Fasten plates tightly against the subfloor, and avoid crushing the tubing channel. Add insulation below suspended floors to direct heat upward. Keep the design temperature within the flooring manufacturer’s limits. A common mistake is treating reflective foil as a replacement for insulation. It is not. Field installers also find that rushed measuring causes unnecessary gaps near walls and doors. I would recheck the layout before fixing every plate. Small errors are easy to ignore during installation, but expensive to correct after the floor is finished.
| Selection Factor | Common Options or Typical Data | Role in a Hydronic System | Recommended Selection Guidance |
|---|---|---|---|
| Plate material | Aluminum is the most common choice. Copper transfers heat more readily but generally costs more. Steel-based plates are less thermally conductive and are used in selected applications. | The plate spreads heat laterally from the tubing across a wider portion of the floor surface. | Choose aluminum for a practical balance of thermal performance, weight, corrosion resistance, availability, and cost. |
| Thermal conductivity | Approximate room-temperature conductivity: aluminum about 205 W/m·K, copper about 385 W/m·K, and carbon steel about 45–60 W/m·K. | Higher conductivity helps reduce temperature differences between the tubing and adjacent floor areas. | Do not select by conductivity alone. Plate coverage, tubing contact, subfloor construction, insulation, water temperature, and floor finish also affect performance. |
| Plate configuration | Staple-up plates, snap-in or clip-in plates, and grooved-panel plates are common configurations. | The configuration determines how the tubing is retained and how closely the plate contacts the tubing and building surface. | Use plates designed for the installation method. Grooved panels are suited to new floors, while staple-up plates are often used below an existing wood subfloor. |
| Tube compatibility | Common hydronic tube sizes include 3/8 inch, 1/2 inch, and 5/8 inch outside diameter. Plate channels must match the tube size. | A correctly sized channel keeps the tube in close contact with the plate and limits air gaps. | Confirm the actual tube outside diameter before ordering. A loose channel reduces contact; an undersized channel can damage the tube during installation. |
| Plate width and coverage | Typical plate widths are approximately 3 to 12 inches, depending on the product design and tubing layout. Some plates cover one tube; others cover adjacent areas more broadly. | Wider coverage improves lateral heat distribution and can reduce warm and cool striping. | Select the widest practical plate that fits the joist bay, grooved panel, or floor layout without interfering with fasteners or structural members. |
| Plate length | Individual plates are commonly supplied in lengths from roughly 2 to 8 feet, although available sizes vary by design. | Length influences installation speed, the number of seams, and how evenly the tubing load is distributed. | Use longer plates where access and transport allow. Use shorter plates around obstacles, perimeter zones, and irregular floor areas. |
| Plate thickness | Many formed aluminum plates are manufactured from light-gauge sheet metal, commonly around 0.016 to 0.050 inch thick; exact dimensions depend on the design. | Thickness affects stiffness, durability, handling, and the plate's ability to remain in contact with the tubing and floor assembly. | Choose a thickness appropriate for the installation environment. Avoid selecting an unusually thin plate if it is likely to be bent, stepped on, or poorly supported during installation. |
| Tube spacing | Common layout spacing includes approximately 6, 8, 9, or 12 inches on center, depending on heat loss and floor construction. | Closer spacing produces more uniform floor temperatures and can support required heat output at lower water temperatures. | Base spacing on a room-by-room heat-loss calculation. Use closer spacing near high-loss exterior walls or where low water temperatures are required. |
| Installation location | Plates may be installed below a wood subfloor, within a grooved panel, or above a structural subfloor beneath a finished floor system. | Location determines heat path, response time, access requirements, and compatibility with the floor assembly. | Verify the complete floor build-up, including subfloor, underlayment, finished flooring, insulation, and available installation depth. |
| Subfloor contact | Direct and continuous contact is preferred. Gaps can occur because of uneven framing, damaged plates, poor fastening, or incorrect channel sizing. | Good contact lowers thermal resistance between the tubing, plate, and floor surface. | Fasten plates according to the installation instructions and keep the tubing fully seated. Do not use methods that could puncture or crush the tube. |
| Floor covering | Tile and stone generally transfer heat efficiently. Engineered wood, laminate, carpet, and resilient flooring require product-specific temperature and installation limits. | The floor covering adds thermal resistance and may limit allowable surface temperature. | Confirm the floor covering manufacturer's radiant-heating requirements and include the covering's thermal resistance in system design. |
| Heat output requirement | Output varies with tube spacing, water temperature, flow rate, floor construction, insulation, and room heat loss. There is no single output value for every plate. | The plates help distribute heat but do not replace proper hydronic circuit design. | Size the system from calculated room heat loss and use tested or engineered performance data for the complete floor assembly whenever available. |
| Corrosion considerations | Aluminum, copper, and steel have different corrosion behavior when exposed to moisture or dissimilar metals. | Corrosion can reduce structural integrity and create installation or maintenance problems. | Keep plates dry, prevent prolonged contact with wet materials, and follow the tube, fastener, and plate manufacturer's material-compatibility requirements. |
| Insulation below the system | Insulation type and thickness depend on the building assembly, climate, code requirements, and whether the space below is conditioned. | Insulation directs more heat toward the occupied space and reduces downward losses. | Provide an appropriate thermal barrier below the plates and maintain required clearances from combustible materials, utilities, and ventilation paths. |
| System response time | Underfloor systems with low-mass plates generally respond faster than systems embedded in thick concrete or other high-mass assemblies. | Response time affects thermostat control, setback strategy, and comfort during changing outdoor conditions. | Choose a low-mass plate assembly when rapid control is important; use appropriate controls for high-mass floors. |
| Installation quality check | Check tube seating, plate alignment, fastener placement, circuit length, pressure testing, and protection from construction damage. | Correct installation preserves heat transfer and reduces the risk of leaks, noise, uneven heating, and service issues. | Pressure-test the tubing before covering it, document circuit layouts, and inspect the installation before the finished floor is installed. |
They connect warm tubing with the floor above. Plates spread heat across a wider surface. This reduces cold stripes.
Aluminum transfers heat efficiently and adds little weight. It is also easy to handle during installation. Shiny does not always mean better.
Omega-shaped plates grip tubing closely and reduce movement. Flat plates may leave small gaps. Those gaps can create uneven floor temperatures.
Confirm tube diameter, joist spacing, floor construction, and required water temperature. Plate choice follows the heating layout, not the catalog alone.
A practical target is 80–95% of each active bay. Exclude cabinets and fixed furniture. Actual coverage depends on spacing and floor finishes.
Not always. A 150-millimeter layout usually feels more even than 300 millimeters. Insulation and water temperature may matter more.
Close contact lowers thermal resistance and improves heat transfer. A 0.5-millimeter gap can slow floor response. Tiny gaps matter.
Fasten plates tightly against the subfloor. Add insulation below suspended floors. Protect tubing from fasteners and avoid crushing its channel.
No. Reflective foil is not a substitute for insulation. The wording sounds convincing, but the materials perform differently.
Recheck measurements near walls and doors before fixing every plate. Test one representative bay first. A neat installation can still perform poorly.
Choosing the right Hydronic Heat Transfer Plates is essential for building an efficient, comfortable, and reliable radiant heating system. Start by understanding how the plates distribute heat from water tubing across the floor surface, then evaluate the heating load, floor structure, insulation, tubing layout, and available installation space. These factors determine which plate design and system configuration will perform best.
Compare plate materials, shapes, thicknesses, and installation methods to find a balance between thermal conductivity, stability, and ease of installation. Plate size and coverage should provide even heat distribution while minimizing cold spots and energy loss. It is also important to confirm compatibility with the tubing, flooring, subfloor, and moisture conditions. Finally, consider durability, maintenance requirements, labor time, and total installation cost rather than focusing only on the initial product price. A well-matched solution can improve system efficiency, protect the floor assembly, and deliver consistent indoor comfort over the long term.

 Flotte Energy